

A step-by-step tutorial for converting closets into DIY built in shelves & a living room office transformation.
We’re in the final stretch of the McNay project! It hasn’t been a quickie makeover (hardly any of our projects are really), but good things take time. And our latest DIY built in shelves turned out so amazing!
UPDATE: See the full living room / office reveal of this space here.
And this big change we made on the office side of the McNay’s living room is gooooood!
Feast your eyes on the “before” first though:

I mean… can we just appreciate that 1960s wet bar inside of that left side closet for a sec? Groovy, baby.
And now check out that after!
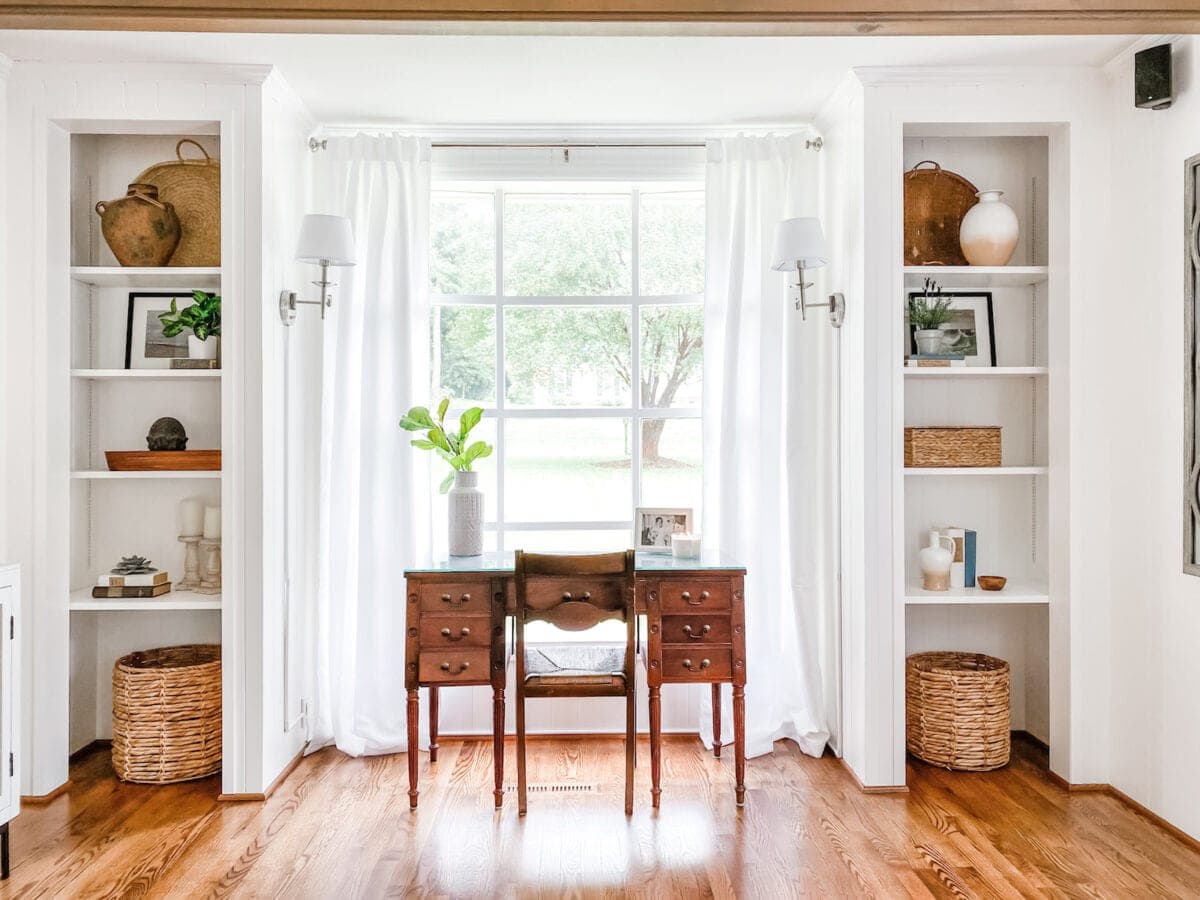
These little squatty closets were so tiny and the doors were so skinny that King and Heather said they just wanted them gone with built in shelves put in their places.
But then we thought maybe we could work with the existing structures to convert closets into built in shelves.
It wasn’t exactly an easy job, BUT it was at least easier than ripping it all out and starting over from scratch. (The irony is not lost on me that in our own home office we DID build closets from scratch.)

How to Convert Closets into Built-In Shelves
(Some affiliate links are provided below. Full disclosure here.)
Supplies
Steps
1. Remove closet doors and use a hammer and pry bar first to remove the door frame and trim.

2. Use a framing level and tape measure to mark with pencil the new opening size you want to create for the built-in shelves.
3. Cut along the pencil line with the circular saw.

4. And using the oscillating multi-tool, cut away any wood pieces at the corners and edges for a clean cut.


5. Measure the dimensions of the new opening of the closet and use it to cut a 2×4 with the circular saw and a saw guide to its length.
6. Place the 2×4 flush at the top of the opening and nail in place. This is the new header.
7. Repeat Step 5 using a 1×6 board.

8. Measure the sides of the closet opening to mark and cut lengths using 1×6 boards.
9. Nail the 1×6 boards in place at the sides.


10. Caulk all edges and cracks, and use wood filler in any nail holes or knots.

11. Sand wood filler smooth with a mouse sander and medium grit sandpaper.

12. Then prime and paint. (We used Behr Polar Bear in satin.)

13. Screw the pilaster strips to the sides of the closet walls, and attach the brackets at your preferred height.

14. For the shelves, cut out MDF panels to the dimensions of your closet.
And decorate!

For the past month, I’ve been collecting antique store finds and painting items from my thrifted stash to give the shelves a rustic, coastal feel.

Like these cute vases I got for $2!

That sweetgrass basket I found in an antique store reminds me so much of Charleston. And the urn in front of it is from the low country of SC.

I cannot wait to show the rest of this space soon after a few final touches!
Just for fun, here’s one more before and after of this side of the room because I can’t help myself.


I couldn’t resist giving y’all a peek because the suspense is KILLING ME!
If you want to save this post for later, you can pin it here:


Frequently Asked Questions
What do you do with deep built in shelves?
The advantage of deep built in shelves is you can layer items more easily like artwork, book stacks, and baskets. Labeled bins are the most versatile for taking advantage of more storage capability on deep shelves. But remember, you don’t have to fill up every little space just because it’s there. Less is more.
How do I update my old built ins?
Try removing any molding or ornamental details that might date the look. Opt for a fresh coat of paint or stain. Change the hardware. Add some new lighting. You can even try replacing just the cabinet door or door fronts with something more modern for less than rebuilding the entire built in shelving unit.
Are built in shelves outdated?
Not at all. They’re one of those elements that will never really go out of style and will likely always remain a classic. Some details might date built in shelves, but there are ways to tweak them to change the look relatively easily (see question above).


