


This post is sponsored by Sunbelt Rentals.
How to replace iron balusters and newel post for a DIY staircase makeover on a tight budget by using tool rentals to reduce project costs.
Add this DIY project to the list of ones where we say, “Why didn’t we do this sooner?!”

While there was really nothing wrong with our stair railing before, it just wasn’t our style. I’m sure someone at some point in our home’s history really enjoyed it.

Is It Easy to Replace Staircase Spindles?
The good news is you can replace just the spindles rather than replace the entire banister as an inexpensive way to get an updated look, and most staircase systems can be altered as an intermediate DIY project.
I almost felt guilty for wanting to change the stair balusters in our foyer because I know so many people love that twisty basket wrought iron look. But they were just too intricate for my taste, and I wanted to change the the chipping, reddish gel stained wood handrail to a neutral color anyway to complement our mid-tone hardwood floors.
When I mentioned it to Robert, he said, “I’m so glad you want to change that! I don’t like it either, but I didn’t want to say anything in case you liked it.” (Bless. I think I’ll keep this guy.) So a project was born.
We needed a high performance reciprocating saw to handle the big job of slicing through our old wrought iron balusters, so we rented one from Sunbelt Rentals to fill the gap in our tool arsenal.

If you have the right tools, replacing stair spindles (or balusters as the technical term) is a great project to do yourself and can save up to thousands of dollars instead of hiring out. Removing iron balusters just requires more power and patience than wood.
Especially in a DIY project you’ll likely only do once, it’s more cost effective to rent the specialty tool you need from the thousands Sunbelt Rentals has available.
It wasn’t easy to find much information online about how to replace iron balusters (only tutorials on how to replace wooden ones), but the rental equipment specialists were able to guide us to the correct method for the job.

We chose to replace our existing iron stair balusters with a different style of iron balusters, but you could also use this method to replace any type of existing balusters you have with wood balusters, if you prefer a more traditional style.
There are so many staircase railing styles out there, and you can mix and match handrails, newel posts, and balusters to customize the look you want.
The good news is if you have wood balusters or plan to replace metal balusters with wood balusters, wood is much easier to work with than metal because it’s easier to cut and easier to repair in case of a mishap.

Replacing Balusters for a Simple DIY Stair Makeover
Tools
- Reciprocating saw (A high powered one like a 60 Volt cordless reciprocating saw works best on iron balusters.)
- Multiple reciprocating saw blades (Cuts are easiest to make with a fresh blade, so change your saw blade after every 3-4 balusters. Be sure to get a metal cutting blade for iron balusters and a wood cutting blade for wooden balusters.)
- Shop Vacuum
- Drill
- Drill paddle bit (The size you need will depend on the diameter of your newel post, if you’re replacing that too.)
- Forstner bit (The size you need will depend on the diameter of your balusters.)
- Phillips bit
- Pliers
- Hack saw or miter saw
Supplies
- Stair balusters (We used these 5/8 in plain round powder coated metal balusters)
- Stair shoes (Use stair shoes that match your balusters’ diameter and style, and check your staircase design to decide if you need angled or flat shoes. If the balusters attach to a step at a 90 degree angle, you need flat shoes. If the balusters attach at an angle to a stringer, a board that runs at an angle alongside the steps, you need angled shoes.)
- Newel post (Optional: Our old newel post matched the twisted wrought iron style of our old balusters, so we had to replace it. We used this plain round iron newel post.)
- 4×4 wood block (Optional: to use as a newel post base)
- Speed square
- 4 2-in self-drilling wood screws
- 3/4-in self-drilling wood screws
- Wood filler
- Proper safety gear – work gloves, safety glasses, closed toe shoes
- Heavy duty construction adhesive
- Painters tape and pencil
- Bonding primer
- Waterborne alkyd paint in satin
- Pro quality 2-in angled paint brush
- Fine grit sandpaper
- Tack cloth
*It helps to have a partner help you with this project.

Step 1 – Remove Old Balusters
We were honestly really intimidated to start removing the old balusters at first, but often the secret about DIY projects is facing your fear.
Balusters are usually attached to a handrail and treads or a stringer with adhesive, epoxy, and/or screws. So inspect your old balusters to see how they are attached. Remove any screws or nails first with the drill or pliers. Ours were simply glued in.
Place a piece of painters tape around each baluster. Number each one in order. This will give your saw blade some grip as it makes its initial cut while also allowing you to save your balusters to use as a measuring guide for cutting new balusters later.
Starting at the painters tape, use a reciprocating saw (with a metal cutting blade for iron | wood cutting blade for wood) to cut the baluster in the middle.

Have your partner hold the top of the baluster to reduce pressure on the handrail and prevent the wood from cracking.
WARNING: Be sure to cut away from the direction of your partner and have your partner stand well behind the saw to prevent any contact with the blade.
Once cut, each end of our balusters came out of the handrail and treads fairly easily with a gentle wiggling motion. For any stubborn ones, use pliers to break away the old adhesive.
Replace your saw blade after cutting every 2-3 balusters. Dull blades create more friction putting more pressure on the handrail and increasing the chance of damage.
Use the shop vacuum often to clean up any tiny metal shards leftover from cutting.

Once cut and removed, set aside the old balusters and line them up in order so that you can use them as a reference for cutting your new balusters (this is where the numbered painters tape comes in handy).
Tip: If you also plan to replace your newel post, only remove one or two balusters and then skip down to Step 4! This is important to maintain your handrail’s support.
Step 2 – Clean Up Old Holes and Resize With the Drill
To keep things as easy as possible, it’s a good idea to reuse the same spacing and old holes leftover in the treads and handrail from the removed balusters with new balusters around the same size.
Remove any old adhesive or epoxy from the old holes using a forstner drill bit the same size as the holes. A forstner bit is less likely to cause wood splinters in the hardwood treads and handrail to make a clean, smooth hole. If you have it in your toolbox, it’s a much better choice than a paddle bit for this step.
Check to make sure the holes are large enough to fit your new balusters; drill your holes larger to fit as needed. If the holes are bigger than the balusters, the shoes can be used to conceal those later.
Step 3 – Cut New Balusters
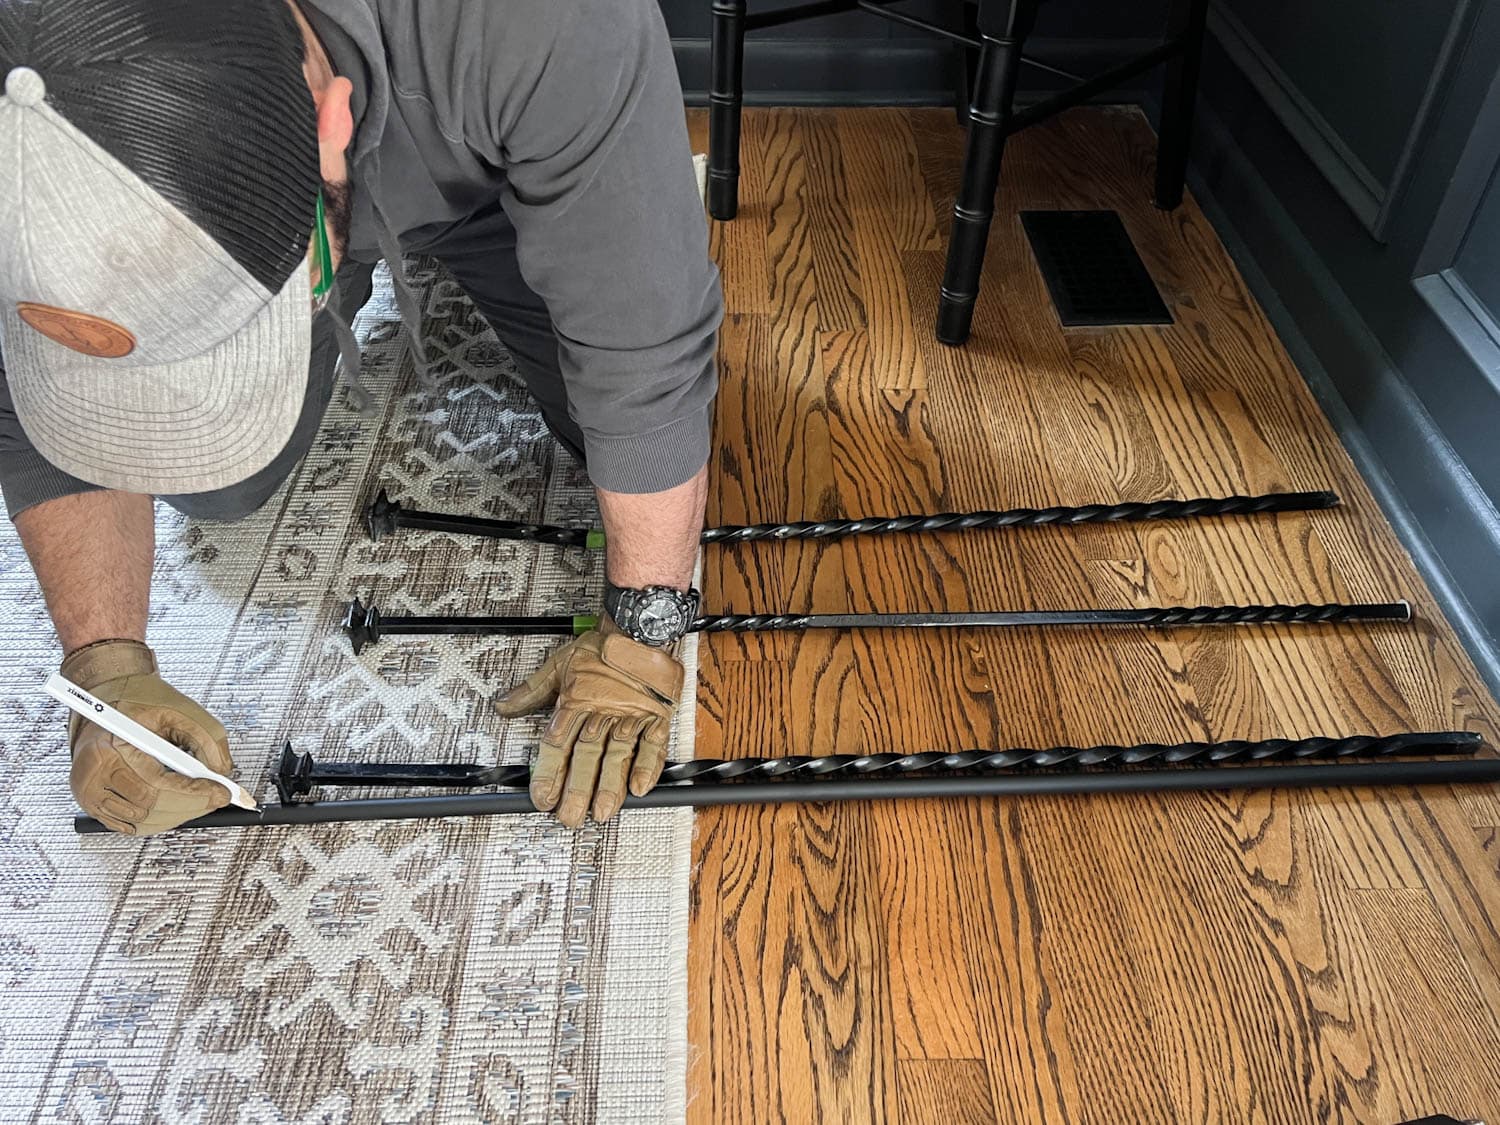
Use your old balusters that you numbered and set aside in Step 1 as a reference to mark the measurements for your new balusters with a pencil.
If your old balusters are not usable, measure the space between the top of the tread and the bottom of the handrail and add an inch.

Use a miter saw or just a simple hack saw to cut through the new iron spindles. (If using wooden spindles, a regular hand saw will do.) We placed a couple of towels underneath the iron spindles so the black finish wouldn’t get scuffed on our sawhorses.

Dry fit the new spindles to make sure they all fit on the stair railing, but remove them and set them aside for later. It’s easier to paint the handrail next without any spindles in the way.

Step 4 – Attach a New Newel Post
This step won’t apply to every baluster replacement project, but because our stair railing’s newel post matched our old spindles with its ornate iron basket design, we had to replace the newel post as well.
Our handrail’s design curls around the newel post, so we had to remove two spindles to get them out of the way so that we could access the newel post. Leaving most of the spindles intact for this step provided enough support under the handrail to allow us to replace the newel post.
Cut and remove the newel post the same way as the balusters. Our old post was mounted on a wooden block screwed into the tread. After removing the iron post, we cut away the wooden cap and removed the screws from the block to reveal the post hole.
On a new 4×4 wooden block, we used a speed square to mark an X and find the center of the block. Placing the new newel post in the center of the X, we traced it as a guide to drill a hole.
We used a paddle bit to drill the newel post hole. Using a regular drill bit, we drilled 4 pilot holes halfway through the block.

Once drilled, we set the new newel post into the block on the tread and into the handrail. To anchor the block to the tread, we drove 4 2-inch wood screws through the pilot holes.
Then, we just filled the screw holes with wood filler and applied construction adhesive into the newel post holes in the block and handrail.
(We waited to attach the last two spindles around the newel post until we could completely sand, prime, and paint the block so that we didn’t have to work around any obstacles.)

Step 5 – Prime and Paint
It’s a lot faster and easier to prime and paint the handrail before replacing balusters. Lightly sand the surface to give it “tooth” and wipe away any dust with a tack cloth.

Use a pro quality angled 2-inch paint brush to apply a coat of waterborne bonding primer.

Once the primer is dry, sand it smooth with a fine grit to eliminate brush strokes. I like to use just simple sandpaper (not a sanding block) so that I can easily contour it into the curves and grooves of the handrail.
Use a tack cloth to remove sanding dust.

Then, apply two coats of a waterborne alkyd paint. (We used satin sheen – even though that photo above depicts semi-gloss because I decided last minute that satin worked better with the finish of our new balusters.)
Waterborne alkyd paint is best for stair railings because it cures to a durable, hard surface that can withstand continuous traffic. It’s self-leveling so brushstrokes disappear as it dries to a smooth finish.

Step 6 – Attach New Balusters
After the paint is dry on the handrail (overnight is best), begin installing the new balusters. Slide a shoe onto a baluster and apply a some construction adhesive into the handrail hole and tread hole.
Insert the end of the baluster into the handrail hole. There should be enough extra room in the handrail hole to push the baluster slightly upward so that the bottom end slides into place in the tread hole.

Apply a little more construction adhesive into the handrail hole after the baluster is in place for extra security. We used some painters tape to protect the black metal spindles from any adhesive messes and removed the tape right after application.
To secure the balusters to the treads, we set 3/4-inch self-drilling wood screws beside the iron spindles so they were snug in the holes.
Then, we slid the shoes down over the tread holes for a clean look.
We let the construction adhesive completely dry for at least 24 hours before touching up with paint.

DIY Stair Makeover After
Check out that sleek new black stair railing! Well, it’s half new anyway.
Our stairs are now the perfect blend of modern and traditional, which you know, if you’ve hung around here for a while, is exactly how we like it.
I do think sometime later this year I’d like to add a runner to the steps. Those bare wooden stair treads are a little slippery and loud without one. Plus, it would be so pretty! I’ve toyed with the idea of painting the stair risers a different shade too. What do you think?
Runner or not, I can’t get over the difference 6 years have made in our foyer and staircase.
Never underestimate the power of paint and good old fashioned will power.
Not to mention, that Facebook Marketplace console and our family gallery wall worked some magic too.

How much does it cost to replace stair spindles?
This project was so much more budget-friendly than hiring a contractor and absolutely DIY-able.
Because we didn’t have to buy a higher powered saw to handle the wrought iron removal and could rent the necessary tool from Sunbelt Rentals instead, we managed to do this project for even less.
The total cost of the tool rental, saw blades, primer, paint, adhesives, new balusters, newel post, and disposable materials was $383 total.
Of course the longer your stair railing, the more expensive it will be. If you were to replace the handrail as well, that would increase the cost.


So that’s it. The almost official before and after, with maybe only needing the addition of a stair runner… or a little ceiling treatment… maybe a real wool vintage rug eventually. But the stair parts are finished!
Okay, you know what? There is never actually an official “after” because the journey is the best part. 😉
But that stair railing? It really is the after I’ve dreamed of for 6 years.
More DIY Home Improvement Ideas
Frequently Asked Questions
Balusters and spindles are essentially the same thing. Balusters usually rest on a footing, like a step. Spindles are supported by a horizontal rail underneath.
The general rule is to have 3 stair balusters per foot, about every 4 inches.
Square wood balusters sizes are usually 1 1/4″, 1 3/4″, and 1 5/8″.


